Design, build, re-design, re-build, repeat…

Every time a storm would roll in, so basically every day in the spring and early summer, I would have to go out and undo the tangle of wires that would become of my 80/40 fan-diple-style inverterted vee antenna. The antenna was at one time connected to the eye-bolts on the body of the balun – something that experienced operators know is a cardinal sin. I payed the price as I re-hoisted the antenna late one night, and one side of the antenna came-slack, nearly falling to the ground.

The next build, used a dog-bone insulator, which supported the balun in the middle , and the two wires from each leg on the outside holes. This worked well, and allowed me to get it on the air in just a short amount of time. The downside was that there was no improvement to the wire tangle issues I was having. My next thought was that I needed to add another pair of spacers to keep the wires from getting too close to eachother. Had I solved it? Yeah, kinda. The spacers, located nearer the feedpoint, separated the wires well and kept it looking cleaner. The problem was that I had not really solved the issue, I had just made it more difficult for the wind to be able to spin the 40 wire around the 80 wire.

Next! So, one day as my wife, Sarah, was cleaning out the kitchen of unused items I spotted a cutting board which had been elected to be tossed. Faster than the constant C, I darted to the pile and adopted said plastic sheet for use in antenna projects. This plastic was perfect for building insulators from! I hauled out the jigsaw and made a series of incredibly poor cuts into this sheet and ended up coming out with a house-shaped lump of it that I would then line with copper on each side and drill a number of holes for rope and wires.

Thanks to the wonder of Imgur, here are a few photos I am happy to share! Check them out in their full HD glory here: http://imgur.com/a/qRQEI


The new centerpiece of my 80/40 meter fan-dipole-style Inverted vee.

Cheers,

VE7WNK

Careless WSPR

Can you hear “Careless Whisper” without getting sucked into an earworm induced one-man hum-saxophone party? Naw, me neither…

It’s been a while since I have updated this page and I wanted to take a few moments to thank all of you who have been following.

Today we are going to be talking about a beacon mode known as WSPR, from K1JT, the author of JT65. WSPR works by sending a two minute (in WSPR-2 mode) long tone which slowly sends out a station’s call sign, TX power in dBm, and Maidenhead Grid Square. WSPR stands for Weak Signal Propagation Reporter, and as the name suggests protocol is for determining where the band is open to. WSPR does not require the band to be wide open, and in fact it seems to show the band open when it really is slammed shut. Due to the way it’s designed, the protocol does not need a perfect reception on the other side, thus making it suitable as a weak signal mode. While I believe WSPR is designed to be used with low power it seems many are using roughly 100 watts at times.

I thought it would be a decent way to test to my 80 meter antennas. Currently I have  a North-South-broad 80 meter inverted-vee, an East-West-broad 80/40 fan-inverted-vee, and of course my 80 meter loop antenna. I set them up in an equal head to head to head.

The test was as follows:

  • RX for 10 mins (5 cycles)
  • TX for 2 mins (1 cycles)
  • 10 watts TPO as measured at the rig.
  • Repeated twice in a row A,B,C,A,B,C style so as to reduce the effects of band changes.

On the first test I was ‘spotted’ in Arizona and California on my North/South inverted-vee. I received stations in Texas, Oregon, and California. This did not really impress me as I can often hear guys in California on 80 at night. I blame my ridiculous noise floor for my failure to receive more stations. I will have a separate video and blog entry detailing my noise struggles.

Next, it was time to put the newest antenna to the test. I loaded up the East/West 80/40 inv-vee and it was stellar by comparison. The match on this antenna is poorer in the low band where WSPR operates, but has far superior free space around it. This antenna did not hear much better, same issue as before, but I did get a station from Nevada, somewhere in New England, and one in the Denver area. The second round on this antenna netted me more stations, but getting into W1 territory on 10 watts on 80 meters really had me on psyched up.

While still on a high from this very positive result I opted to test out the loop to see what kind of pattern it offered. After 15 minutes I had no new stations, and it seemed to mirror the N/S vee perfectly. A longer test may be required, but I had other plans for my evening. I hope to leave the radio on this antenna one night in the near future. It is worth mentioning that the night that I did this there was substantial aurora visible in my area and the scope showed no other stations on the band.

Now, this is where things got fun. 80 was a relatively soggy band last evening, so I played around on 40 meters. A few TX’s netted me Australia, Barbados, and the East Coast! This was a blast! That night I would leave the radio on while I slept and it would transmit about once an hour, but would spend most of the night receiving. When I woke up I nearly coated everything in coffee when I spotted Thailand had not only heard me, but I had heard them! I was shocked! THRILLLLED! You can see the live map at any time here.
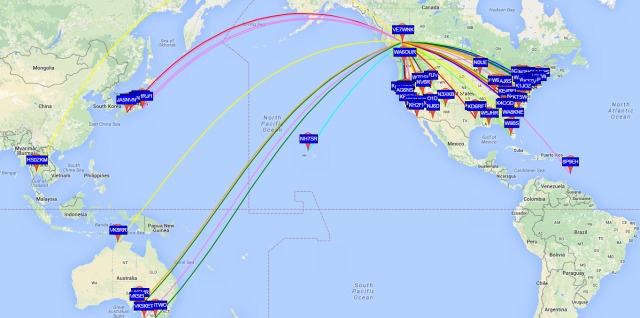
Click for larger version.

Hawaii, Thailand, and the East Coast on 40 meter WSPR.

My next plan is to do the same on 20 meters. I have two antennas, a 20 meter monoband vertical that I made a few years back. Originally, this antenna was for 10 meters, however when I planted it here in Quesnel the radials doubled in length, quadrupled in number, and grew to 1/4 lambda on 20. This antenna is not ideal, but it loads up perfectly and might be suitable for this test. My second antenna on 20 is actually my 80 meter loop which loads up nicely on 20.

Overall this may be my new favorite digital mode. I did have some challanges with getting the software running, but once I got those worked out I was able to get it working with the IC7600 without any additional hardware required. I found that I was getting better results with WSPR-X as it was better suited to the audio issues with the IC7600′s Texas Instruments PCM2901 and Windows 7. Yet another reason to move to Win 10? Maybe, maybe not…

For now, thanks again for reading and I wish you a brilliant holiday season and all the best for the New Year.


Been way too long…

It’s been far far too long since I last posted about my favorite hobby – Amateur Radio.

Last time I posted I didn’t know but my land lord wanted their condo back so that their daughter could move in. Since then I moved nearly 700km and am living in the Cariboo region of British Columbia. I adore my new home and land, a place that allows me to have antennas!

Here are all the things I have failed to blog about:

Radio Projects

  • 80 meter loop around my back yard with ~270ft of copper-clad steel wire, fed with 450ohm window line.
  • 40 meter delta loop, mounted vertically, fed with 1/4lamda of 75ohm coax, and then ~35ft of 50ohm RG213.
  • 20 meter vertical (as seen in a previous post).
  • 10 meter mobile whip mounted on a pole.
  • 2 meter/70 centimeter Comet GP-6 antenna mounted on the roof, with LM400 snaked through the roof.
  • Antenna grounding system. >3ft deep hole with a grounding plate and 2-gauge wire back to the shack.
  • 6 meter portable Yagi temporarily installed.
  • 8-port antenna pass-thru for coaxial lines into my ham-shack.
  • Everything on radio bench has been grounded to a common bus.
  • Fixed the VE7RQL Dragon Mountain Repeater in Quesnel (spares swapped in and tuned, a big thanks to VE7LAL, VE7GLS, VE7ANL, and others for parts, access, and accompaniment)
  • Fixed the VE7RES Milburn Mountain Repater in Quesnel (Battery charger and string of 2V cells were hooped. Worked with VE7PW, VE7YY, VA7RC, and VE7EQU to get spares and then did the install with VE7YY)
  • Installed APRS on Dragon Mtn. Donated a Comet GP-3 to the cause.
  • Installed a BCWARN link from Dragon Mtn to Milburn Mtn, and a shot to an ISP who is letting trickle bandwidth for the APRS Digi on Dragon.
  • Convinced two locals to get their amateur radio accreditation (no, they did it all on their own). Congrats to VE7EOL and VE7BNR.
  • Installed a controller-managed “APRS reset feature” up at Milburn Mountain. VE7EQU, Andy, supplied a salvaged 12v relay, and VE7EOL and I went up there and wired it up and programmed the controller. The power uses the NC contacts, and when we send a DTMF code to the controller over the air it will run a macro to engage the relay (opening the NC path) and then disengage it after 3 seconds. This provides a power reset for the Tiny Trak TNC that keeps locking up.
  • Wrote a Perl script to collect data from my weather station via the WeatherUnderground API (which I feed using the Acu-rite bridge) and send it out over APRS-IS where the Dragon Mtn I-Gate will beacon it (because it is within the programmed 25km radius for Internet-to-RF beaconing). All of this just so that I can look at pretty icons on my Kenwood D710g.
  • Working on fixing a remote VHF base with UHF-uplink. POS….
  • Collecting derelict repeater hardware from various places. The Two Sisters Mountain Repeater, the VE7ZOE Wells BC repeater, etc…

Tech Projects

  • New Computer (Asus Sabertooth X97)
  • New Firewall (pfSense in a VERY over-the-top build)
  • New home network cabling (Cat6 everywhere)
  • New NAS (FreeNAS with 4x1TB NAS-optimised drives)
  • New VMWare ESXi home-lab. Sarah is using the Redmine application on it’s own VM to manage our wedding planning. She calls it Wedmine.
  • Weather Station installation.

Home Projects

  • Bought a new home, and moved into it…
  • New roof.
  • Replaced the “garberator” in the kitchen.

Life Projects

  • Weightloss
  • New role at work.
  • Not much else…


It’s been an awesome year!

Dual SDR project case

This weekend I wanted to clean up the octopus of wires and devices around the BCIT ARC so that other users did not complain about the mess. The laptop PC that is used at the main station computer is notorious for EMI/RFI noise so an enclosure box was required. I scrambled some parts I have had laying around, including a USB hub and some cables then went to RP Electronics (a local electronics dealer) and purchased a project case to put everything in. I wanted to be able to enclose everything in one clean case. This case contains two SDR dongles, the upconverter, the hub distributes power and data and then there is a case-mount USB pass-thru connector so that just one cable goes back to the PC. DC power can be supplied from the USB, or if you have an AC outlet near by, you can power it from the wall instead so that you don’t overload your machine’s USB power source.


Part 1

Part 2

Part 3

Parts:

  • Case: Hammond, Rugged, die cast aluminum alloy enclosures. Two piece lap joint construction provides protection against dust accumulation and water. Also provides for improved EMI/RFI shielding.
  • Upconverter: A high-quality RF (MF, HF) converter for software defined radio devices like the RTL-SDR.
  • SDR Dongle: NooElec TV28T v2 SDR & DVB-T USB set including antenna and remote control. R820T tuner is guaranteed.
  • USB Hub: 7 port powered USB hub.
  • The RF cables were from various sources. I would recommend just hunting around on EBay for more.

A gift from VE7FET

Lee showed up with a toy for me to play with. There is not much to share or say about this other than it worked like a charm and is a great learning tool.

In the video I look at NOAA weather radio on 162.550…